Pages
▼
Tuesday, June 29, 2010
4th of July!
Well, my friend Aubrey sent me some goodies in the mail and they are all over this card! The ribbon and the buttons are all from her (Thank you!).
4th of July and the sailboat are both cut from Designers Calendar™ cartridge. The "4th of July" didn't have a shadow feature, so I just cut it out a little bit bigger and I think it still looks great!
I embossed the sailboat with two folders: the A2 Swiss Dots Embossing Folder™ and the A2 Combo Birthday Wishes™ folder. I just used the part below the candle tops. I love the striped look!
The paper is kraft, DCWV neutrals (dark and light blue), and the DCWV Taj Mahal stack.
This card qualifies for three challenges:
Wee Memories: red, white, and blue
The Cuttlebug Spot: Independence Day
Cricut Carz Challenge: 4th of July
My best friend Kourt is active duty in the Air Force right now (she just graduated from medical school!) and I think I'll be sending this to her. I hope everyone has a wonderful and safe 4th of July.
Monday, June 28, 2010
Wedding Card!
I made this card for Cricut Cardz Challenge #30: wedding theme.
I loved this paper from the DCWV Luxury Stack although it's a little brighter blue in person than showed up in the photo.
I cut the cake and cake background at 4.75 inches from the Summer in Paris Cartridge™ with the real dial size on.
I added a little ribbon around the three layers and the bow at the bottom. Then I popped the whole thing with pop dots. Easy Peasy and classically gorgeous.
Sunday, June 27, 2010
OTWC#13 and Peachy Keen Stamps Challenge #31
This card was made using the Peachy Keen Stamps Challenge sketch:
and with the inspiration photo from Off the Wall Craftiness:
The challenge at Off the Wall Craftiness was to use the colors from the inspiration: pinks and blues.
I had a great time making this card. The paper is from K and Company, placed onto kraft card stock. I cut out the images from the Storybook Cartridge™ and made the shadow circle bigger so that it would suffice for the sketch challenge. I used my flower punch to cut out the background for the buttons, stamped it with the Hero Arts™ stamps CL272 set, added some ribbon, and glued it all on! :)
I hope you like it!
Saturday, June 26, 2010
Embossed Tag
I was feeling super girlie when I made this card, so the colors are very bright for me. I used the A2 D'vine Swirl Emboss Folder™ with my Cuttlebug™ on the tag. The tag was cut from the Sentimentals Cartridge™.
I made this card for The Cuttlebug Spot.
I have been making a lot of cards in the last few days and they are all so different! I hope you enjoy them and that you are having a wonderful weekend!
Friday, June 25, 2010
Thank you very much
Well, I made this thank you card last night and I'm still learning how to let the ink dry before continuing with the rest of the project. Somehow I always manage to touch the ink. Oh well. I still like it and that's what being home made is all about!
This was my first time using the ribbon tabs on the side and I love how they turned out. Just a simple card to say thank you!
Wednesday, June 23, 2010
Just Saying Hello - WMC11 and OTWC12
I knew what I wanted to do with this card since the weekend, but haven't had time to sit down and put it together. Last night I stayed up a little too late because I just had to do it. :)
I welded the triangles from a liner feature on the Wild Card Cartridge™ to a rectangle liner also from Wild Card Cartridge™. I hid the inner triangle on the layer with the new hide contour feature and of course played around with the shapes and sizes. I also found the oval on the frame feature on the Wild Card Cartridge™ as well. So while none of these shapes were intended for use the way I used them, that's what's so great about Provo Craft™! I did it all on my Gypsy™ and then cut it out.
I finally decided to use my EAD Background Flourish Stickerz that I won over at The Caffinated Cropper - aka Amy's blog (THANKS AMY!). I haven't wanted to use them because then they would be GONE, but since one of these challenges that I'm entering it in might win my crafting supply drawer more stickers, I decided it was worth the risk. :) These Stickerz are just SO much fun to work with!
I stamped the sentiment with my Hero Arts™ stamps and away we go!
This was made for the following challenges in mind:
Off the Wall Craftiness:Mint, White, Black and a splash of Red
Wee Memories Challenge #11 : Stickers!
Sunday, June 20, 2010
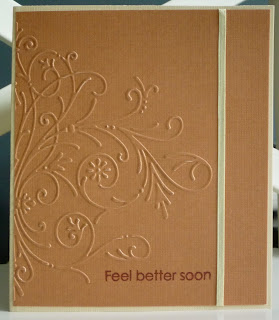
Feel Better Soon
I love this card. It shows a lot better in person as the colors are a bit warped, but it was simple and timeless. I used my Cuttlebug™ and a folder from the Embossing Folders Love is in the Air Set™. I just used half of the design on one of the 5x7 folders.
I stamped it with a sentiment from Hero Arts CL 272. Simple, but it's ready to head out to someone who needs to feel better soon.
Saturday, June 19, 2010
Happy Anniversary Lee Parents!
Well, it's my co-parents anniversary today and I made this very simple card to say thank you for their commitment and providing such a great example for my husband and now our marriage together.
I simply cut the dark blue card stock in a regular rectangle, and cut a light blue piece that would fit on top and still be big enough for my new A2 Flourished Frame Emboss Folder™ that I got from Hazel (thanks again girl!). I also used my Hero Arts™ stamps that I got from Kourtni and my black ink pad and voila! Simple, timeless, and classic: just like my amazing co-parents. Oh, and I used my new white gel pen to write on the dark blue on the inside - I love the way it looks!
I am also using this card to enter into the Cuttlebug Challenges wedding card challenge. On our wedding day, our DJ (and good friend) played a song called "Happy Anniversary" while we slow danced to it and it really sunk it that this was the anniversary that we would be celebrating for the rest of our lives. So, I am submitting this card because it meant so much to us and it was the start of the most wonderful thing that happened in our lives. Enjoy!
Friday, June 18, 2010
Whimsy Haven Sketch Drawing - Just for You
Over at Whimsy Haven they were doing a sketch challenge. I decided to participate because I liked Amy's sketch! You should also check her blog out because she puts packages of scrapping supplies together and sells them and they are oh so cute and with the coupons, usually pay for themselves! June's package is called Pocket Full of Sunshine. But I digress...
I designed this on the Gypsy™ using the Gypsy Font™ for all of my basic shapes and stretching them, etc. I ran the blue squares through the Cuttlebug™ with the A2 Persia Die/Emboss Combo™ folder (Thanks Hazel!!!). I just placed them carefully along different parts of the embossing folder and I love the different effects!
The white circle was cut with the Gypsy Wanderings™ cartridge. The "Just for You" sentiment is from Hero Arts™ stamps. I thought this could make an good masculine card as well.
Enjoy!
Balloon Card :)
This is another cut from the Summer in Paris Cartridge™ that I just knew I had to make into a card on the Gypsy™. I cut it as just over 4 inches and all the swirls cut out fine, but the strings that attach to the base of the balloon were VERY delicate and I did end up breaking one. So I would cut it larger next time for that.
I stitched with my little white gel pen around the edges and added a small yellow bow. The sentiment on the inside is from my new Hero Arts™ sentiment stamps that Kourt got me - I'm a bit obsessed with them right now as I've never been able to add sentiments! :)
This card qualifies for the following challenges:
Wee Memories: Stitching
Cricut Cardz Challenge: Vacation Theme
I also made it for BBTB2: Summer theme with a stamp, but unfortunately by the time I got an SD card the contest had closed. Oh well. Their next challenge is to use a fish. I don't even know if I have a fish on my cartridges, but I know I have a whale - I think that counts! :)
The color is off because I am using my little point and shoot right now. The color of the card matches the picture of the front of the card. The inside came out more yellow than it actually is.
Have a wonderful weekend!
Thursday, June 17, 2010
My dog ate my SD card... literally...
So, I will be posting a picture of said SD card later, but it is true. After taking my SD card out of my computer last time, I put it on the bed. Our 7.5lb Yorkie grabbed it without me noticing. A little while later I heard a funny crunching noise. She was under the bed chewing on the SD card!
I will definitely be taking pictures of the SD card when my husband brings our other SD card home from work today and will be posting my latest creations then.
My grammy (grandmother) even called this morning to ask if I was feeling well since I hadn't posted anything new lately! haha! I just have no way to do it! But I have made a few things that I cannot wait to share as they pertain to contests as well. :) Have a wonderful afternoon and I'll be posting later.
Monday, June 14, 2010
Hello Friend and my friend Kourt's card
I made two cards during the swarm on Saturday and this was actually the first one I made. I didn't realize you had to seal the pigmented inks when stamping, so I smudged this one and was close to tears when Kourt said, "it's alright friend, that's why it's home made and people love home made things!" I can always count on her to cheer me up.
I just cut the card and the layer and then cut the tag from the Heritage Cartridge™. I stamped the sentiment with my new Hero Arts™ stamps and Color Box™ ink (this is my first time using it - any experiences stampers know of better ink?). Easy Peasy.
Kourt made a Father's Day card and I wanted to share it because this is the first card she has made and I think she did fabulously! She actually cut the envelope twice (one of the layers was flipped) so that she could use one side as the liner for the card. She cut shadows and embossed a layer and I'm just beaming with pride! So here is her card too. :)
Sunday, June 13, 2010
Celebrate - Getting Spoiled by the Girls
Well, my birthday has come and gone and my girls spoiled me with crafting supplies. My best friend Kourtni got me a cartridge, some super cute paper, Hero Arts™ sentiment stamps and an acrylic block (my first stamps)! My bridesmaid Hazel got me Cuttlebug™ folders! :) I am so excited and I just HAD to try them out! We had a swarm on Saturday the 12th and I got the chance! :) So, without further ado, my "Celebrate" card.
I made it with the Sentimentals Cartridge™, my new Hero Arts™ stamps, and my new A2 Perfectly Paisley Emboss Folder™.
This card is for the Off the Wall Craftiness challenge. The challenge was a light blue, chocolate, and white.
Friday, June 11, 2010
High Heel Shape Card
This card was made for the Cricut Cardz Challenge and The Cuttlebug Challenges.
Cricut Cardz Challenge: Shoes
Cuttlebug Challenges: Paint
I love shoes although I don't own too many of them - just enough ;). But I was so excited to see this challenge. I knew I wanted to play with the shoe off Summer in Paris Cartridge™. I simply welded it with the Gypsy™, cut it out, added the black bow, and then.... added nail polish. Yes, you read right, nail polish. I was worried because we don't have any paint in our house and the Cuttlebug Challenges asked for paint. Then I realized that I did - but it wasn't in the form that I think they were expecting. None the less, here is my creation! I plan on writing on the inside, "Happy birthday to a very stylish girl". If you've ever watched Breakfast at Tiffany's, the girl that is with Paul Varjak - his "decorator" calls herself a "very stylish girl" in this wonderfully swag voice.
The envelope is from Wild Card Cartridge™
Enjoy!
Thursday, June 10, 2010
EAD Designs Color Challenge - Plum and Damask Chandelier
Well EAD Designs picked a great first challenge - Plum Shabby. Their inspiration work was plum and black damask so I played on that theme, but made it gold damask instead.
The card is a frame from the Sentimentals Cartridge™ welded on the Gypsy™. The chandelier is embossed with the Embossing Folders Love is in the Air™ set. I used an extra frame edge to form the line across the card (I should have welded it on my Gypsy™ and then done it, but oh well. I had other plans and they went array.
This was my first time trying vellum and I think I will stick with vinyl. I will give vellum another try, but the first attempt was not too pleasant. But, I always say you have to try something more than once.
All this and the new release of the Cricut Lite's is out! 24 new cartridges! It does feel like my birthday - which is good, because it is my birthday! :) Have a wonderful day. I certainly will and will be posting another card I made tomorrow. We are having a cocktail party for my birthday and I am making a lot of hor d' oeuvres, so I won't be doing much else. I love cooking so it should be great. The hard part is not eating what you're creating as you go! :)
Monday, June 7, 2010
Peacock Feather Card
I have been waiting to use this cut from the Sentimentals Cartridge™ for a while now and I was SO excited to cut it out as a card. As soon as I saw it I wanted to make it into a card instead of an embellishment.
Anyway, I was keeping track of the challenges and Cuttlebug Challenges had challenge that was using Aqua, Pink, Turquoise, Raspberry, and Swimming Pool Blue.
These are not normal colors that I work with (besides the pinks as previously discussed), but I thought they might look pretty all together as this feather. I'm still not sure what I think of the result and the time of evening is horrible for photographing, but here is the result. I just have to keep looking at it. I think I like it, but if I were to do it over again, I wouldn't put the blue in the center. I was trying to "pull the colors together" from the back to the front, but I think it stands out too much. Well, without further ado, here it is.
AND I'm SO excited about the Provo Craft® announcement telling us that they are releasing 24 cartridges on Thursday - Thursday is my birthday and it will certainly feel like a treat! :) Have a great evening!
You Are My Sunshine
I made this card for my dad. Even though I tried to make it masculine, it still came out a little girly, but my dad is a father of an only girl (me) so he's used to that. When I was little and he was late coming home for work or just when he was thinking about me after I went to college, my dad would sometimes call and sing "you are my sunshine" to me. I (since about high school) now call some of my chick friends or my husband occasionally and sing the song to them on their answering machines. So, this "you are my sunshine" is going back to dad as most times fathers don't know what they did right in your life and what is now being passed forward because they loved you the way that they did.
That being said, I was also trying to work in some challenges and this one qualified for four of them.
Cricut Cardz Challenge Blogspot - Father's Day Card
The Cuttlebug Spot - Sketch Drawing:
Wee Memories- WMC9 - "Punch It"
BBTB2 -Use an image of a Sun from Doodlecharms Cart - which I didn't have so I used one from the Designers Calendar Cartridge™ - It's my border on the left if you can't find them. :)
All of the layers - including the card base are from the Gypsy Wanderings Digital Cartridge™ - they were tag shadows that I just stretched on my Gypsy. I welded one of the rectangles to 5 suns from the Designers Calendar Cartridge™ to get the left panel and added another layer.
The embossing on the bottom is from the A2 Border With Love Emboss Folder™ set. The square panel is popped with pop dots and the kraft paper flower was punched out. I added the buttons to the center of three of the Suns and I added ribbon to the bottom.
The "YOU" was from the Designers Calendar font and was squished on the Gypsy. "Are" and "my" were welded and cut from the Gypsy Font™ and "sunshine" was from the Gypsy Wanderings Digital Cartridge™.
There is a lot going on in this card - I think I am going to make it more simple next time. Let me know if you would like the Gypsy cut file as it is all on there. Happy looking!
Friday, June 4, 2010
Mom's birthday card - Vintage - EAD Designs
My mom wanted a "big card" for her birthday. Since she is the reason I make cards as I have always had to make her cards for special occasions, I am particularly soft to bend to her requests. I used to just fold a 8.5" by 11" piece of construction paper in half and went to town so she bought all these frames to display my cards on the wall that fit my cards. My last Mothers' Day card is "too small to fit in the frames" so here I am making another big card for her.
I used all my favorite paper that I had been hoarding (the green is just SO me). And the pink I had bought intending to use it for her a while ago. So, with using my EAD Designs vinyl from the Rub-ons Vintage Collection, I had my little masterpiece! :) I put a close up picture of the word "vintage" so that you could see it had it's own style to the font.
I couldn't help but use the Vintage rub-on. My mom is a great vintage :). Happy Birthday (on the 7th) Mom!
Enjoy and I hope she likes it!
Wednesday, June 2, 2010
Pink Chandelier
Oh pink, how I have come to love you. While olive green remains my favorite color, when I was little I hated pink (redheads don't look very good in pink). Now, I LOVE it and can't seem to get enough, but I still don't wear it.
Anyway, here is the pink chandelier card with it's matching envelope. The envelope was cut at 4.25" from the Sentimentals Cartridge™. The chandelier was once again embossed with the Emboss Folder Love is in the Air Set™. I used Core'dinations™ card stock for the background layer that I embossed the chandelier into and sanded it down with some light sand paper I found in my husband's tool kit (thanks, husband!). I also sanded around the edges to distress it a little. And voila!
Due to the poor lighting, the colors didn't exactly come out right in the picture and the card base paper can be seen better on the inside of the card, but you'll get the idea. Enjoy!