This project was inspired by my friend Melinda Spinks. She basically created this design concept and I am totally in love with it. I have done several seasonal projects like this but I wanted something that would stay up in the girls’ room for a long time so this came to mind! The Bundle of Joy collections are too cute for words and the color scheme is perfect for their room. I cannot wait to make a prominent place for this in their room or to hang it on their door!
The first step is to see what your workable area is. While this frame is “10x10” the area that you will actually see is more like 9 1/4. So keep that in mind when you are choosing the size of your object.
Here is a screen shot of my 7x7” circle. I liked the negative space that it was going to have around it so that looked aesthetically pleasing to me. Draw a circle using the circle tool on the left. Then use the “scale” window (highlighted in blue) to input the exact numbers of the circle so you don’t have to fuss with it.
Now there are two fun ways to do this project. 1: Decorate the circle you cut out and the paste it onto some fun background cardstock. 2: Trace around the edge of the cut out circle with a very light pencil or embossing tool. That will give you your outer line visual to decorate inside of.
My particular assignment was to work in the stamps into my home decor project. No problem! I did this in several ways. First of all: I just stamped the words “Little Lady” onto my paper. That’s what we call our girls in hopes that they will grow up to be little ladies. :)
Another way is to heat emboss the stamp. I used a watermark stamp pad, poured my embossing paste onto it, tapped the excess off and used a heat embossing tool to heat set it.
Now the fun part about the designer die and stamp sets is that the dies match perfectly. So I chose my background paper carefully because I wanted a pink edge showing behind the gold. You can secure your die with a piece of washi tape and run it through your manual die cutting machine.
Here are my sweet little hearts on my project.
I also heat embossed the lamb stamp onto some cute paper using white embossing powder. I then manually cut out the lamb from my paper. *Tip: If you don’t have heat embossing powder and a gun then just stamp the lamb onto a white piece of paper and stamp it again onto the patterned paper. Cut out the parts of the patterned paper lamb that you desire and paste onto the white lamb. Then cut out the white lamb. This is called paper piecing and you will get the same effect if not cleaner. I will show you how to do this on a later post.*
Here is my little lamb finished and on my project. I love the soft, delicate nature.
I LOVED this baby onesie die cut (complete with heart!). What a fun way to get some patterned papers in there!
Now just add, add, add. Stickers, chipboard shapes, die cuts, brads, etc. are all fair game. If you want to make the stickers dimensional simply add foam tape to the back and before you peel off the sticky part use baby powder (or flour works too but is a bit gritty) to de-stickify the rest of the sticker. This was a tip I actually got from Wendy Sue Anderson! Game changer. Love this banner.
That “girl” chipboard just HAD to be on my piece. The way that it is floral patterned so delicately!!?! love it.
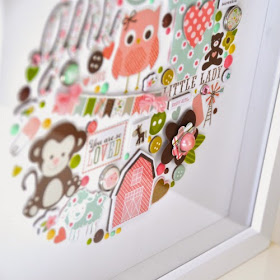
Here is a side shot to see some of the fun dimension.
Here it is all finished! Wouldn’t this make a great baby shower gift? I have a baby shower coming up for a baby boy… I think I know just what to do. ;)
Supplies:
Twine or Ribbon
VersaMark Ink Pad
Gold Embossing Powder
Manual Die Cutting Machine
Heat Embossing Gun


