Pages

Friday, April 29, 2016

Charlotte's Birthday Party - Under the Sea themed

Hello out there and welcome to Charlotte Rose's Under the Sea themed 2nd birthday party!!! Doodlebug fans are like family so... here is mine! :)  Yep! That's me with my husband and three daughters. :) Charlotte is the one on the right with the crazy wind-blown hair. :) 

Here was her invitation:
Mermaids, Fish and Whales that are Blue, 
Charlotte Rose is turning TWO! :) 


I just had to get that pink whale on the invitation. Is that not the cutest. thing. ever!?! I added just some white dots around the outside edge of the invitation part as I wanted to give it a little "bubble" or port-hole feel.


So... this was my first time making a birthday hat! I had such a great time with this simple project! I didn't even use a template for the birthday hat. I kind of winged it! Then I made a pom pom out of ribbon (thanks to an old Lori Allred tutorial!) and added some pom pom ribbon at the bottom. 

I hot glued a few doilies stuck together onto the front and pop dotted that castle with the number 2 on it! I hot glued some ribbon to the insides so I could tie it onto her head. I loved the ribbon under her chin look. But I would probably use elastic next time as she got tired of it before I did. :) Done! ;) 

Here is my 2 year old goof ball wearing her party hat!

And of course her sister needed to try it on as well :)

Here was the end of my little cake and favor table. We were outside since it was a gorgeous day! What were the favors you ask?!?... scroll down one picture....

Yep, I did it. I was "that" mom.. I gave way goldfish for their favors... real goldfish... well, what else was I supposed to give away at an "Under the Sea" themed party!?! :) The kids were STOKED. The bowls I got at the dollar store (candle holders), the goldfish were each 5 cents. I got a fish net per family (99 cents) and I got one thing of fish food and just divided it into small plastic bags for each family. The total cost of each favor was $3.50 after tax!!! And.... the kids' faces were priceless! 

My parties are never complete without paper straws! I just put baby powder on the backs of these stickers from the icon sheet and hot glued them onto the straws. Easy and the kids could remember whose cup was whose! 

Look at how fun and festive they are!!! 

This was such an easy cake topper that it was almost cheating. :) I used the "so sweet" from the "this and that" sticker page and the banners ends came from the banner pieces that are ready-made (see supply list below) I simply ran the doodle twine through the holes and hot glued it onto some bbq skewers.

Lastly, no party of mine would be complete without a personalized banner. I wanted to keep this simple as I knew I was doing a lot of decor. I thought the starfish look would tie in nicely. I think the chunky twine really is the star of this banner. It added the best texture! 

I hope you enjoyed my Under the Sea themed party! Thank you so much for virtually attending! I am so sorry I cannot share the cake! We ate it all. :) Have a beautiful day!!!

invitation:
doodlebug: under the sea: under the sea (5109)
doodlebug: under the sea: mermaid ruffles (5104)
doodlebug: cardstock: swimming pool (3392)
doodlebug: under the sea shape sprinkles: under the sea (4953)
white gel pen

banner recipe:
doodlebug: under the sea: under the sea (5109)
doodlebug: under the sea: whale tales (5113)
doodlebug: under the sea: mermaid ruffles (5104)
doodlebug: under the sea: starfish (5110)
doodlebug: under the sea: rainbow bubbles (5107)
doodlebug: under the sea: pink pearls (5108
doodlebug: mini doilies: bubblegum (4597)
doodlebug: mini doilies: lilac (4604)
doodlebug: chippers: swimming pool (4515)
doodlebug: chunky twine: swimming pool (4810)
doodlebug: chunky twine: lilac (4813)

goody fish tags:
doodlebug: under the sea: rainbow bubbles (5107)
doodlebug: under the sea: starfish (5110)
doodlebug: chunky twine: tangerine (4807)
doodlebug: doodles: for you: beetle black (3145)
doodlebug: doodles: for you: lily white (3144)

party hat:
doodlebug: under the sea: sea babies (5106)
doodlebug: under the sea: icons (5143)
doodlebug: mini doilies: lilac (4604)
doodlebug: chippers: tangerine (4513)
ribbon
glue gun

straw toppers:
doodlebug: under the sea: icons (5143)
hot glue gun
paper straws

cake topper:
doodlebug: under the sea: mini banners
doodlebug: doodle twine in lilac (3209)
doodlebug: under the sea: this and that (5148)


Tuesday, April 12, 2016

Anchors Aweigh Card Trio!

You know when there is a collection that you just can't stop playing with? The new Under the Sea and Anchors Aweigh collections have been EXACTLY that for me. Courtney Lee here from Court's Crafts with a trio of cards. 

I have found that as a card maker, usually using the big patterns that are "meant" to be seen as an entire 12x12 page can be challenging - like this map paper. But I just HAD to get it into my design. I loved it! 

I found this scene on one of the 12x12 sheets - it's the one that separates out into 6x4 pieces. 

It was already so darling that I really just added enamel elements to the card like the middle bubble, fish, and some shells. 

I also added some sand using some liquid glue and a happy birthday sentiment using doodlebug rub-ons. 

Next up is a card that was pretty simple, but I just had to highlight one of the adorable doodle-pops in this collection.

I seriously had to keep this doodle-pop away from my 3 year old. She was determined to have it! She helped me pick out the patterns on the card and now is very excited to send the turtle to someone. Win!

Look tat the awesome depth on that doodle-pop! :) Also, the sentiment came from the "this and that" stickers. Easy-peasy.

Lastly is a card that I made using our own Mendi's cut file! She made this cut file available for download in a card a while ago. Here was here original post where you can find the download too!

I actually grabbed the clouds from this rainbow. It almost killed me to cut them off but they were too cute!

I made a fun little scene in the center. I added some enamel shapes like the star at the top and the matte sprinkle at the top. 

And I hid a little enamel fish behind the sail of the boat. :)

Here it is again. There is a lot of dimension and it's just fun to look at! 

I hope you had a great time with me today on the blog. We cannot wait to see what you make with this collection! We would love to see what you make with this collection. Share it with us on our Facebook page! 

recipe:
doodlebug: anchors aweigh: anchors aweigh (5120)
doodlebug: anchors aweigh: icons (5145)
doodlebug: anchors aweigh: this and that (5149)
doodlebug: anchors aweigh: 6x6 Paper Pad (5139)
doodlebug: anchors aweigh: shape sprinkles anchors away (4956)
doodlebug: anchors aweigh: shape sprinkles: bubbles (4954)
doodlebug: anchors aweigh: boy matte sprinkles (4955)
doodlebug: doodle twine: baby boy (3212)
doodlebug: anchors aweigh: doodle pops: tiny turtle (4976)
sand

Thursday, April 7, 2016

Tulip Box Card Tutorial

Hello Lori Whitlock fans!!! This is Courtney from Court's Crafts here with a tutorial on Lori's new Tulip Box Card! I made this card for upcoming Mother's Day! I know, I know... I'm a little early but with three kiddos if I am not on top of it then it will never happen!

Step 1: Cut all piece out with your Cricut Explore or Silhouette Cameo.

Step 2: Emboss green stems and leaves.

Step 3: Lori added the numbers on the tabs for you. This helps in two ways: ordering them from front to back on the card and also the numbers allow you to orient them so you can tell which is the front and which is the back of the piece. 

Step 4: Ink around the edges of the green stems and the tulip tops.

Step 5: Using foam adhesive tape, adhere the stems to the green backs. 

Step 6: Add the first layer directly to the back of the front of the tulip box card.

Step 7: Using foam adhesive tape pick randomly which tulip tops you want popped and which ones you just glue down.

Step 8: Add your sentiment.

Enjoy your finished product! 


Recipe:
Lori Whitlock for Echo Park: Happy Summer 6x6 Paper Pad (HS105023)
Lori Whitlock for Echo Park: Happy Summer Blue/Green (HS105018)
Lori Whitlock for Echo Park: Happy Summer Yellow/Teal (HS105019)
Lori Whitlock for Echo Park: Little Man: Cars (LM99004)
Cricut Explore

Tuesday, April 5, 2016

Spring Garden

I'm here today with some thank you cards using the new Spring Garden collection! 

The first thing I was instantly inspired by were the flowers. I knew I wanted to do a flower cluster. I didn't have a plan for this card at all. I started with the die cut orange flower on the left and worked towards the right not pressing anything down too firmly so I could lift and tuck new pieces as I went. 

I knew I wanted to get that adorable ladybug in, the shaped sprinkle flowers and definitely at least one of those awesome matte sprinkles. I finished it off with doodlebug's pre-done thank you stickers. Easy peasy. 

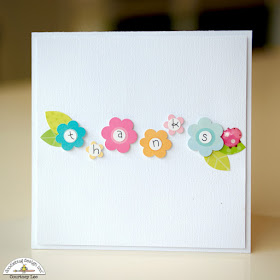
This one was a full concept. I thought about putting the teensy type letters in the middle of the flowers and spelled out the "thanks" using the icon stickers. I popped them all up and then the leaves and the ladybug were an afterthought but are my favorite additions! 

You wouldn't believe how many times I moved around that sweet ladybug before finally deciding on her placement! :) 

I loved all the fancy frills that came with this collection and wanted to show them off. They don't look straight in this picture but that is camera angle I promise. They are straight in real life! eek! haha. 

I just wanted to get you a close up of these scrumptious glossy sprinkle shaped ladybugs. You can see how in love with them I was! :) I popped some of the tulips to help create the border and got some of the sweet roll sunshine sticker icons in there too. :) 

This gorgeous wreath is nestled in the 4x4 squares on the back of the garden flowers patterned paper. I hand cut around the wreath and then started building some extras onto it. I have to say how in love with those blue birds I am. Wait until you see them on my planner! :) The spring flower enamel shapes are really the stunner of this wreath though. The spring flower sweet roll stickers are tucked behind the top right and bottom left of the wreath as well. 

Here they all are again. :) 

And just in case you wanted to see them lined up, here they are. I hope this inspires you to make some springy happy cards using this fabulous fabulous collection!!! 

recipe:
doodlebug: spring garden: spring garden (5090)
doodlebug: spring garden: icons (5140)
doodlebug: spring garden: fancy frills (5141)
doodlebug: spring garden: this and that (5147)
doodlebug: spring garden: garden flowers (5125)
doodlebug: spring garden: shape sprinkles: tiny flowers (4950)
doodlebug: spring garden: shape sprinkles: ladybugs (4951)
doodlebug: spring garden: matte sprinkles: bright assortment (4947)
doodlebug: spring garden: birdies sweet rolls mini icon stickers (5154)
doodlebug: spring garden: sunshine sweet rolls mini icon stickers (5155)
doodlebug: doodles: thank you: multicolor (3131)
doodlebug: cardstock: lily white: (3402)
doodlebug: teensy type: lily white (3435)