Pages

Thursday, November 24, 2016

Happy Thanksgiving!!!

Happy Thanksgiving everyone!!!! Courtney Lee from Court's Crafts here today with a box card tutorial!


One of these tabs is not like the other. It doesn't have scoring marks on it. Don't fold it... You can see that I started to this time! eek! But it needs to stay straight. That is your back piece. Do not assemble the box part. It is so much easier to add the piece while it is flat.

I like to start by adding the panel pieces to the front and back of the box card like so... except for that tall yellow piece. Hold onto that. for a second. It turns out that covers up the "flap" of the box when you put it together. I had to tear mine off and put it back on.

Oh no! I forgot that I wanted to add this gorgeous background stamp to my yellow panels! Even designers make mistakes (ahem.. all the time...). Just add it on anyway! :)

Now assemble the "box" and add the back yellow layer to cover up the flap.

I embossed and inked the edges of the turkey and pop and glue all the pieces to their layers.

Add the layers in and a sentiment and you are done! :) I got this sentiment from the "I Love Family" chipboard: a Lori Whitlock collection for Echo Park Paper.

No matter what happens today remember that the day is all about relationships and being thankful. If you burn the turkey, don't sweat it. You have food to eat. If people fight, don't worry about it. You have people who love each other enough to want to get together on a day - family, friends, loved ones. You aren't alone. And if you are still feeling stressed at the end of it... well... leave the dishes to the morning and go get in your craft room! :)

This is Courtney Lee signing off and wishing you a VERY happy and full Thanksgiving.

Lori's Store: A2 Box Card: Thanksgiving Turkey
S
ilhouette Store: A2 Box Card: Thanksgiving Turkey

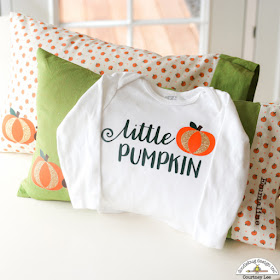
Thanksgiving Onesie and Pillows

HELLLOOOOOOO out there! :) Have you been enjoying the new Doodlebug Flea Market cut files!?! WE LOVE THEM!!!! Courtney Lee from Court's Crafts here with a new family tradition for us!

So our "assignment" (I always put "assignment"s in quotes as I LOVE to play!!!) was to use Flea Market cut files to create a Thanksgiving 3D project. 


At first I was going to make the onesie say "My First Thanksgiving" but then I wanted to use it a ton so I changed it to little pumpkin. :) I thought this would make a super cute hostess gift! If you are going to someone's house for Thanksgiving and they have children from big to little, here are some ideas!

I used the pumpkin from the pumpkins and acorn cut file. Isn't it darling? My little pumpkin looks so cute in this! :) 

Here are the pillows and the story behind them. So my cousin's mom made her kids pillowcases for the seasons and they loved them. Now she does it for her kids too. I thought it was adorable and decided to give it a try. The girls LOVE their pillows!!! 

These are the first pillowcases I have ever made! I think they turned out so adorable! :) And the girls love love love the iron on pumpkin and acorn. 

Here are the three projects together. If you have kids or grandkids, I encourage you to try this! It's SO fun and personal and they will LOVE it!!!

I layered on the iron on just like you would a die cut. Just make sure that you cover the whole image with each layer so that the iron never touches the iron on directly.

This little pumpkin and her sisters LOVE their pumpkin pillows! I cannot wait to make Christmas ones using the Here Comes Santa cut files! :) 

Recipe:
Doodlebug: Flea Market: Pumpkin and Acorn cut file (Silhouette Store = Silhouette cut file)
Doodlebug: Flea Market: Pumpkin and Acorn cut file (Lori Whitlock's Store = SVG)

Wednesday, November 16, 2016

Let's Hear it for Petite Prints!

So.... The new petite prints by doodlebug are AWESOME. I have used them all over the place!!! But for this project I really wanted to showcase the new gingham-linen patterns. 

I utilized the 6x6 paper pad (oh yes, it comes in a 6x6 paper pad too!!!!) 

I added those awesome cardstock stickers for the sentiments (I seriously cannot get enough of these and the fun colors they come in).

I LOVE the new cute clips and put them on my projects EVERYWHERE. They are hiding all over the place and they are not only a fun element, but they also add a really nice texture to the projects. AND the recipient can take them off if they would like to and use them! :) Bonus!

Then I added some cute shaped sprinkles within their color dots and I finished it off with some glittered and matte sprinkles. I love how doodlebug makes all three kinds!


Recipe:
doodlebug: cardstock stickers: thank you multicolor (3131)
doodlebug: cardstock stickers: happy birthday multicolor (3128)


Friday, November 11, 2016

Petite Prints Challenge

Check out my post up on the Doodlebug blog today! Here's my cute little card set. :) 


Monday, November 7, 2016

3D Pumpkin- Lori Whitlock's Blog Hop for November!

Hi all and welcome to the November blog hop for the Lori Whitlock Creative Team!

You should have gotten here from the fabulous Kathy's blog. If not, start HERE at the beginning. 

I bought this pumpkin a while ago. I love it's little look and simplicity. Isn't this hexy paper the cutest!?! I made it using Lori Whitlock's I Love Family collection for Echo Park Paper. 

Normally I would go all out and add embossing and stitching and embellishments but I decided to keep this one just "out of the box" and show you how cute they can be when you choose cute paper! I made this with a hot glue gun in like 15 minutes - no joke! You can resize these in a bunch of different sizes and make an awesome tablescape for your Thanksgiving dinner table! 

Your coupon codes!


 Your FREEBIE for today!!!


Before you head to ANITA'S BLOG enter in the rafflecopter below.


a Rafflecopter giveaway