Friday, April 30, 2010

Blue Moon Scrapbooking Birds and Butterflies Challenge -


So, I loved the swallow on the Sentimentals Cartridge™ and decided to play with that. I actually made this card first and then the one for the Cuttlebug Spot challenge. But I loved that tree so much that I used it in both and played with the grass, fence, etc. I might make them into a series and sell them, but we'll see. My favorite part were the buttons. :) I used my beloved Cuttlebug™, the A2 Forest Branches Emboss Folder™ on the grass in the background, and the A2 D'vine Swirl Emboss Folder™ on the tree. Thanks for stopping by!

SHARE THIS POST - {PINTEREST}

The Cuttlebug Spot Challenge Favorite Flowers!


I found another challenge site and I love how it's challenging me to craft more and stretch my wings. So, while my actual favorite flower is the sweet pea, I chose the "poppy" from the Storybook Cartridge™ as all the poppies in California are blooming right now and it's simply magnificent. With that said and without much more, I used Storybook, Sentimentals Cartridge™ and the Everyday Paper Dolls Cartridge™ for these images as well as my Cuttlebug™, A2 D'vine Swirl Emboss Folder™, and A2 Swiss Dots Emboss Folder™. Enjoy!

SHARE THIS POST - {PINTEREST}

Monday, April 26, 2010

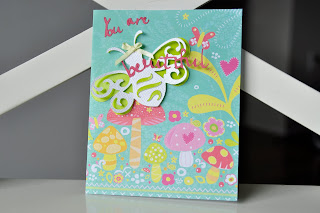
Sentimentals Bee Challenge from BBTB2 - You Are Bee-utiful


This was my first challenge card. I was excited to use the bee from the Sentimentals Cartridge™. The writing I welded with Design Studio™ using the Designers Calendar Cartridge™. This card will be going to my bee-utiful best friend who had a baby 6 months ago and looks AMAZING.

SHARE THIS POST - {PINTEREST}

Other Mother's Day Card 2010


Well, I couldn't just make one card when I have a wonderful mother-in-law as well (we call her my co-mom because she's wonderful and I didn't want the bad connotations to be there). Anyway, so this one is for my co-mom.

I have to say I was tickled pink today when one of my crafting heros Meda decided to "follow" my blog. As icing on the cake (hmm... I was going to make cupcakes today... crafting or cupcakes, crafting or cupcakes, CRAFTING!) Carole, who seems to be the mother of the crafting community that I watch, commented on one my cards.

For the card I used:
Sentimentals Cartridge™
Storybook Cartridge™
Cuttlebug Swiss Dots Embossing Folder™
Flower punch in two sizes
Swarovski™ Crystals

There were four things that I tried for the first time with this card:
I was really excited to use the Scissors from the Sentimentals Cartridge™ so I wanted the card to open up that way (a front opening card).

This was my first attempt using any kind of shadowing feature. I think it really does make a card "pop".

The third element that was new to me was curling the flower edges - an idea that I scraplifted.

And lastly, another new element was making a band that went around the outside.

I used eyelets with my Crop-a-Dile to make the holes because I wanted a very finished look and ribbon to hold the back of it. I'll post a picture of this as I wish more crafters showed the backs of their cards. I often wonder how they get things to wrap around the cards and how they finish them off, so this was my solution to that. Enjoy!

SHARE THIS POST - {PINTEREST}

One Year Blog Anniversary for Janiel!

scrappyjandesigns.blogspot.com

Click over for a chance to win her awesome blog candy!

SHARE THIS POST - {PINTEREST}

Tuesday, April 13, 2010

Mother's Day Card 2010


I like to get ahead of the game and my mom looks forward to my handmade cards every year. So I wanted to be able to share this with you in case you liked it enough to give to your mom too!

Cartridges Used:
Sentimentals Cartridge™
Storybook Cartridge™

Start with Sentimentals Cartridge™
Cut one 4.5 inch
Cut one 4.5 inch
Use Foam dots to adhere piece that was cut out from the envelope to the front of the card to make it pop.
Change to Storybook Cartridge™
Cut .5 inch letters on the Shorty setting. Spell out Happy Mother's Day.
Adhere with foam dots that were cut in half to make them small enough.

Smile and hand it to mom!

SHARE THIS POST - {PINTEREST}

Win a Cricut Cake®

Win a Cricut Cake® at Cuttlebug Challenge Blogspot! They are a fantastic website sponsored by Provo Craft™ which gives us tools to be inspired. Check out their link below!

border="0"/>

SHARE THIS POST - {PINTEREST}

Tuesday, April 6, 2010

I've Been Missing You


I was watching The Notebook, drinking tea, and crafting on a rainy San Francisco day and thinking about my best friend Kourtni (yes, my best friend and I share the same name with different spellings). Anyway, I decided she needed a card to let her know how I felt with her finishing up medical school in Ohio and being so far way. The song in the movie came on, "I'll Be Seeing You" and I just had to act. So, I made this card for her and thought it came out just how I wanted it to.

Cricut Expression™
Wild Card Cartridge™
Flower punch in two sizes and styles
Pink card stock with white flower designs
White card stock
Little white pearl buttons

SHARE THIS POST - {PINTEREST}

Easter Egg Tree


Well, Easter has come and gone, but I thought I would share this Easter Egg tree that I made for the centerpiece of our Easter table (although I admit I got very sick and we ended up eating at our parents' house, but it was still great decoration for the month or so before!).

I used the Designer's Calendar Cartridge™ to find the egg shape. I cut out 6 at 3.5 inches out of sage colored and pre-embossed with little dots card stock. I then used the eggs as the guide for the size of the white side of the paper. I traced 6 eggs onto the white shiny paper and then cut them out by hand as I didn't want to have the same design (which wouldn't line up) on both sides of the egg. I then glued them together. I cut out flourishes from the Storybook Cartridge™ from the same sage colored cardstock and glued them to the white side of the egg. I embellished with Swarovski™ crystals and used my new Crop-a-Dile™ to punch holes and snaps to create a finished look. I cut white and deep purple ribbon to make loops and then tied the tops of the bows to the tree. Voila! Now they will be packed up for next year and hopefully I'll get to use it in the middle of my own table next year.
Enjoy!

SHARE THIS POST - {PINTEREST}
 
SITE DESIGN BY DESIGNER BLOGS