It's the My Pink Designer showcase today over at My Pink Stamper's blog! Head on over there to see what we created! The challenge was a "different fold" card. So I combined a gate card and an easel card to do both. I wanted it to look like windows so I used my Gypsy (I LOVE MY GYPSY) to put window into the card. Here is the picture tutorial on how I did it:
FYI if you don't have a Gypsy, you can use Cricut Craft Room! Check it out and it's FREE!!!
My card base was 8.5x8.5" before I cut it, so I did calculations on where I would need the window to go. Then I hid the outside of the window that I took from Kate's ABC's so that only the boxes cut out and not the whole window which would have defeated the purpose.
I taped the yellow polka dots to the white card stock base where I wanted them. Then I put the blade on 6, speed on high, and multi-cut on 2 to ensure that it got through both pieces of card stock.
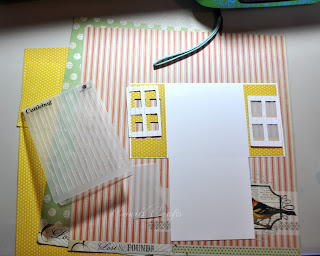
This is the windows so that there are frames around the windows. I cut them out of white and embossed them with the Cuttlebug Distressed Stripes Emboss Folder.
This is what it looked like when I finished cutting it. I actually used the scraps of the 8.5x11" paper to create these. I love using my scraps!
I cut of the bottom 2 1/8" x 4/25" from each side.
Next I embossed the window frames with the Cuttlebug Distressed Stripes Emboss Folder. I cut velum to the appropriate size and used a liquid glue to put it behind the window frames, but in front of the yellow polka dotted paper. Here you can also see the three patterned papers I had picked out for my inspiration for the project. :)
I scored the lines appropriately (I can give you these measurements later if anyone wants them).
I took one of the window pane cut outs (which was a double layer of card stock and therefore pretty sturdy) and put it on the back being careful to only put adhesive on the top half.
I put a piece of card stock to fit the inside and stamped the sentiment so I could use it for a birthday card.
Side view of the easel and the gate portion when open.
Front portion after it has been decorated!
Recipe:
- Sentiment: My Pink Stamper: More Fabulous Phrases™
- Cartridges:
- Cuttlebug Embossing Folders:
- Patterned paper:
- My Mind's Eye: Lost and Found Two: Rosy "Ordinary" Dream Paper™ (pink stripes)
- My Mind's Eye: Lost and Found Two: Rosy "Love" Blossoms Paper™ (yellow polka dot)
- Buttons: My Mind's Eye: Lost and Found Two: Rosy "Love" Buttons™
- Twine: PTI
- Solid Cardstock:
- Bazzill in Java™
- Cricut (green)
- Paper Trey Ink (vellum)
- Glue Arts Adhesive Squares Mini in Perma-tac™
- Foam dimensional tape
- Ink: Momento in Dark Cocoa™
Don't forget to hop on over to My Pink Stamper's blog to see what the other ladies have done with this challenge! :)


13 comments:
That's the most darling card I've ever seen! So much detail and texture. Love those button flowers and the embossed window pane. So pretty!!!!
Court this is SUPER cute!!! I am amazed by your creativity. :-)
LOVE this fold! You're always INSPIRING me Courtney! :o)
Michelle
Such a cute card, and so clever! love your inspiration papers, so perfect!!!!
court, your card is so very pretty and thank you for the tut.
Such a cute card! Love the button flowers!
This is so cute Court! I love how it opens up, right down the middle of the scene on the front, and how it stands up! Oh! And congrats on the Circle Proejct of the Day today for your altered bottle!!!! :)
Super card Court!!! I love the embossing and the cute flowers:) Love the buttons:) Thanks for the tutorial-I may have to give it a shot!
Have a great Thanksgiving Court!
Sherrie K
http://sherriescraps.blogspot.com
absolute the cutest card ever!! love the thought process behind it! I love my gypsy for designing! so what are the measurements - would love to know! tfs :) gotta have these stamps!! doris
parkernana5@cox. net
FANTASTIC!!!!!!!!! Love it!
Court this is a great card!! Thanks for the step by step details!! Christina
What an adorable card! Great colors and I love how you used buttons for the flowers!!
Court, can't believe I missed your stop on the Hop...I thought I had visited all. Anyway, your card is so cute, love how you utilize the Gypsy...isn't she the best!
Good job!
Hope you had a great Thanksgiving and have wonderful Holidays!
Dee B
Post a Comment